

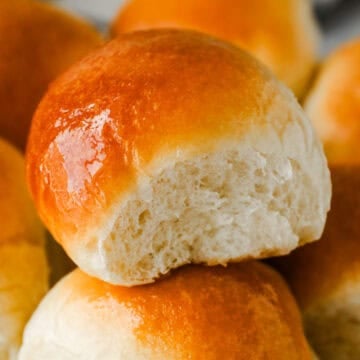
These classic homemade dinner rolls are soft, fluffy, buttery, and made from a vintage cookbook recipe that I tested again and again until it was just right. 👇👇
Sometimes called old fashioned dinner rolls, grandma dinner rolls, or old fashioned yeast rolls, this type of recipe has been showing up in home kitchens and 1950s cookbooks for generations.
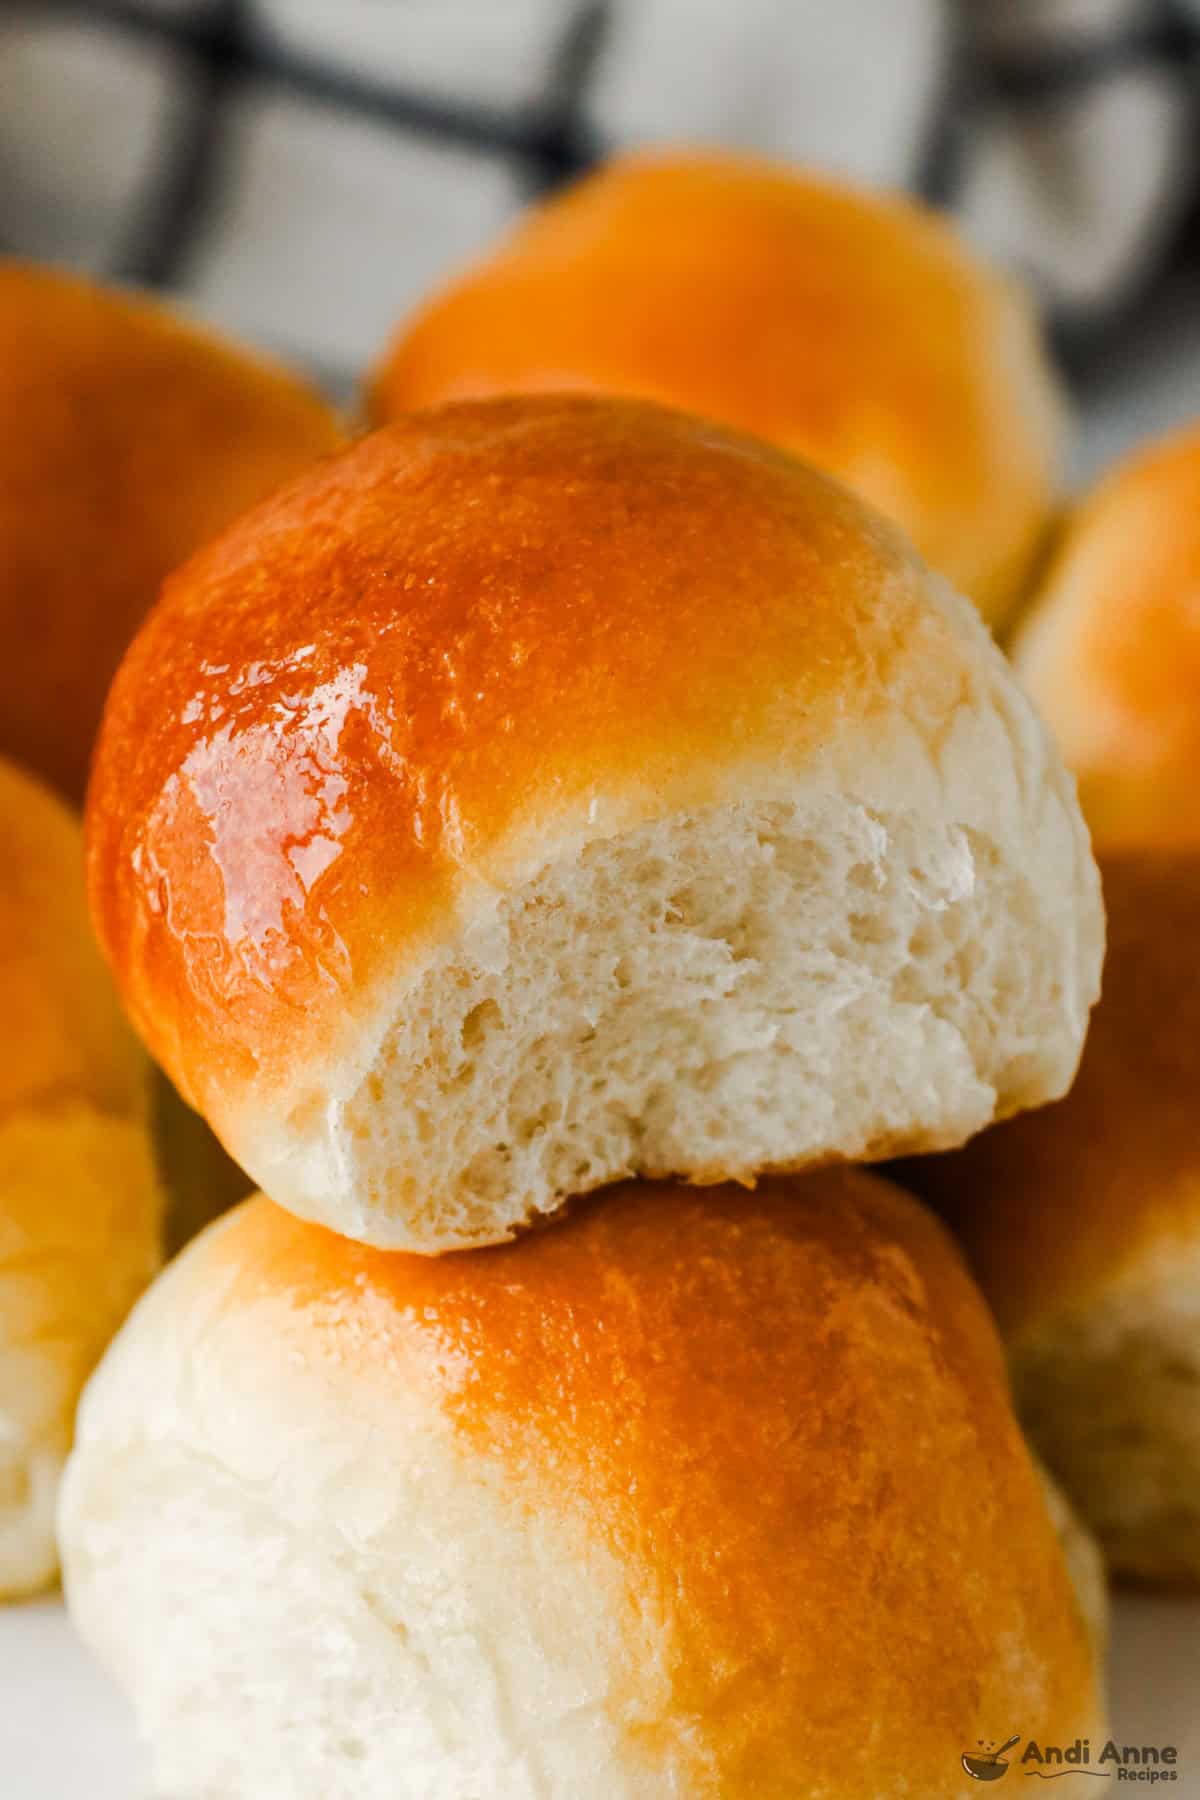
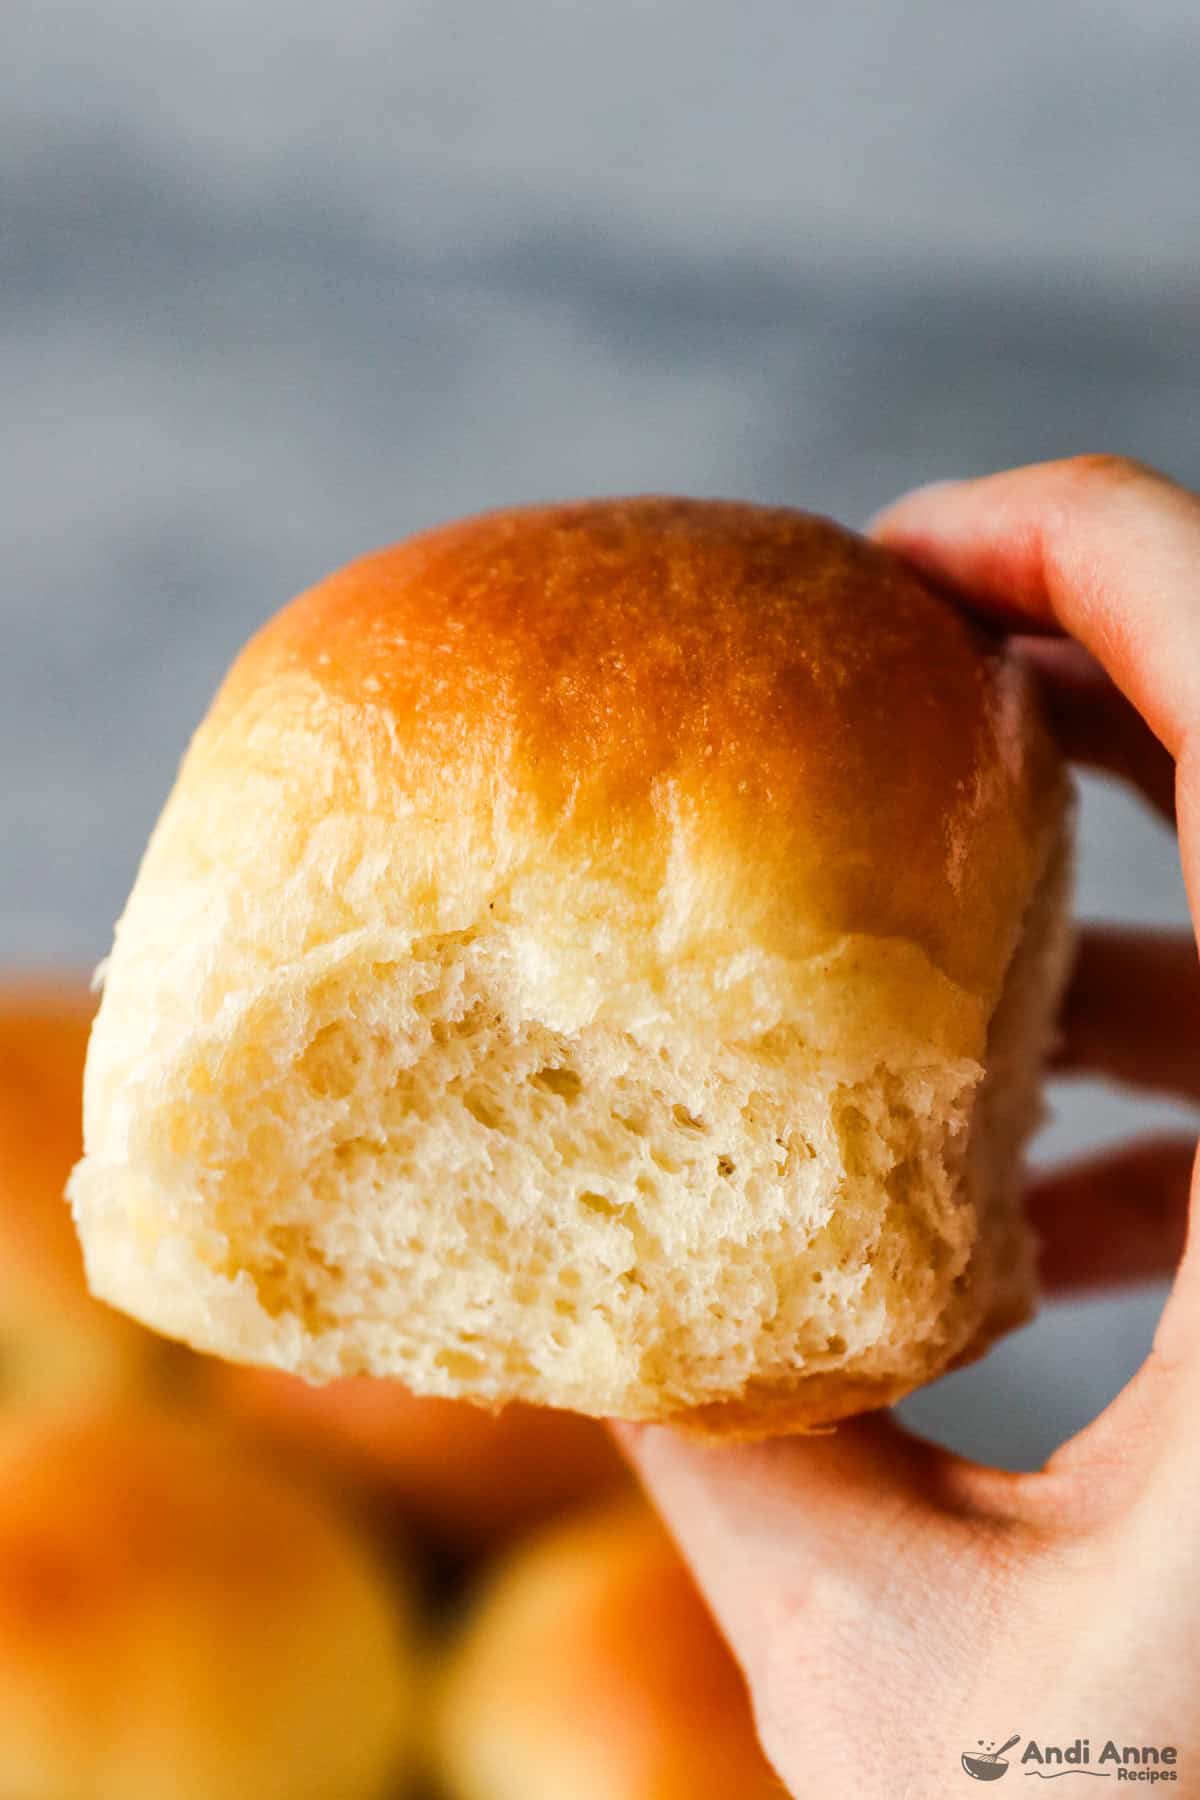
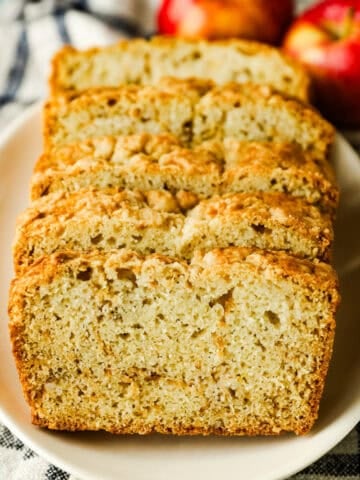
They bake up golden on top, airy inside, and taste like something your grandma would pull out of the oven on a Sunday afternoon.
Why You'll Love This Recipe
- Vintage and reliable. This recipe comes from an old cookbook and has that classic, nostalgic flavor.
- Soft and airy texture. Two packets of active dry yeast create beautifully fluffy rolls.
- This recipe makes about 15 homemade dinner rolls for roughly $4-$5 total, which works out to about $0.30 per roll depending on grocery prices.
- Freezer friendly. Make a batch and freeze extras for quick dinner ideas later.
- Perfect for linking everywhere. These go with soups, pasta, holiday meals, and easy weeknight dinners.
- Simple pantry ingredients. Flour, milk, butter, yeast, eggs, and sugar, nothing complicated.
This is one of those healthy homemade recipes in the sense that it's made from scratch with real ingredients and no shortcuts, just simple baking done right.
What Makes These Dinner Rolls So Soft?
Recipes like this were often called rich hot rolls or old fashioned yeast rolls in older cookbooks.
The combination of a few simple ingredients is what gives these homemade dinner rolls their soft, fluffy texture.
- Hot milk (about hot chocolate temperature)
- Softened unsalted butter
- Two packets of active dry yeast
- Eggs for richness
These ingredients create a dough that feels light and airy even before baking.
On my third test round, the dough rose beautifully for 1½ hours and felt noticeably airy and elastic. That was the version that finally nailed the texture.
What Are Old Fashioned Dinner Rolls?
Old fashioned dinner rolls are soft yeast rolls made with simple ingredients like flour, milk, butter, eggs, and yeast. Many vintage cookbook recipes from the 1950s used this same method of mixing the dough, kneading by hand, and letting it rise before baking.
Some older cookbooks called them rich hot rolls or old fashioned yeast rolls, but today they're more commonly known as homemade dinner rolls or dinner buns.
They're the kind of warm, fluffy rolls that show up at Sunday dinners, holiday meals, and classic family recipes.
Note From Andi
I originally found this recipe in an old cookbook, and after testing it a few times I realized it's basically the kind of grandma dinner rolls that used to show up at Sunday dinners.
This is one of the easiest homemade yeast roll recipes for beginners.
If you enjoy baking bread at home, you might also like this easy crusty Dutch oven bread that bakes up with a golden crust, or this soft and classic Amish white bread recipe which is another simple homemade yeast bread.
Recipe Ingredients 👇👇
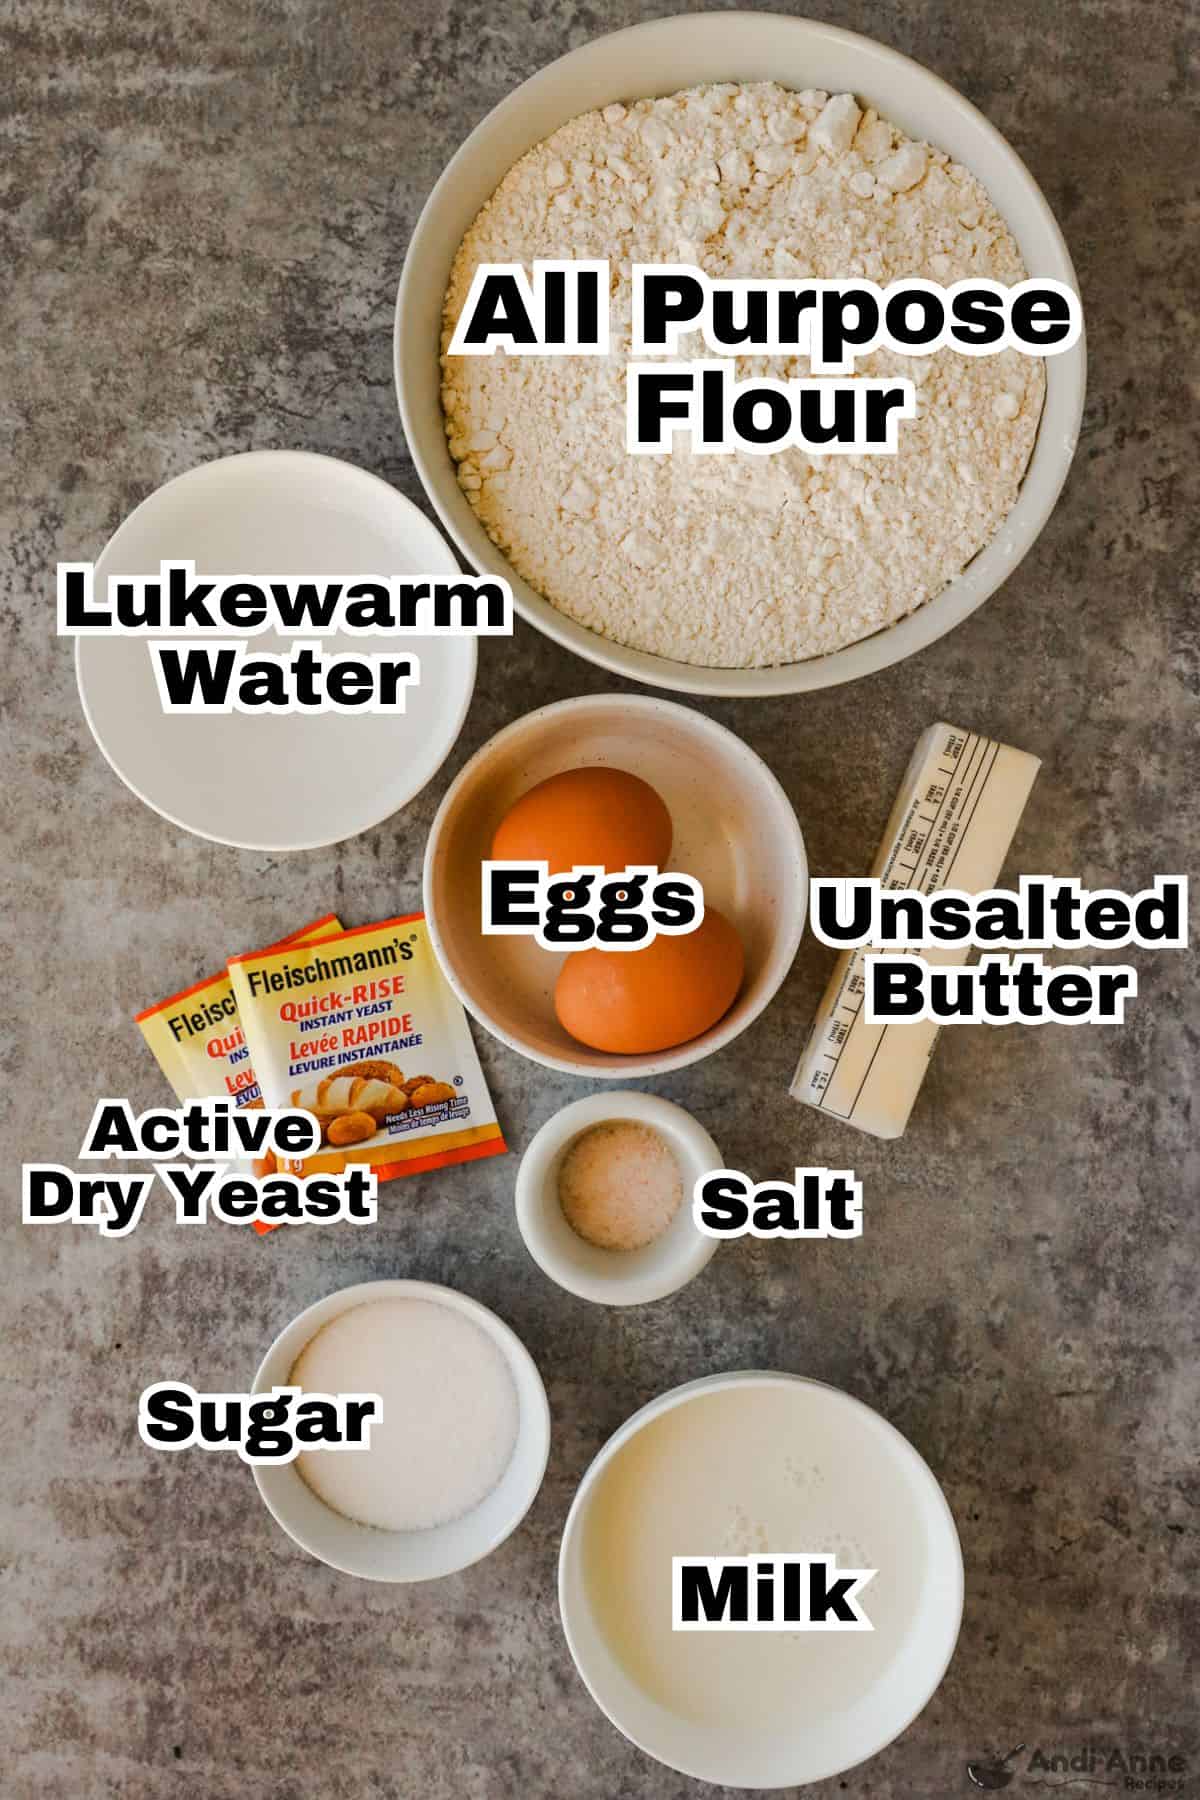
These soft homemade dinner rolls bake up golden on top and airy inside. Here are the ingredients you'll need:
- ¾ cup milk, microwaved about 45 seconds until hot chocolate temperature
- ½ cup softened unsalted butter (or shortening)
- ¼ cup granulated sugar
- 1 teaspoon salt
- 2 packages active dry yeast (about 5 teaspoons or 1 tablespoon + 2 teaspoons)
- ½ cup lukewarm water (110-115°F)
- 4¼ to 4¾ cups sifted all-purpose flour
- 2 large eggs
- Melted butter, for brushing
Equipment Needed: You'll also need a large mixing bowl, an electric hand mixer (optional) and a rimmed baking sheet.
How To Make Classic Homemade Dinner Rolls 👇👇
Step 1: Activate The Yeast
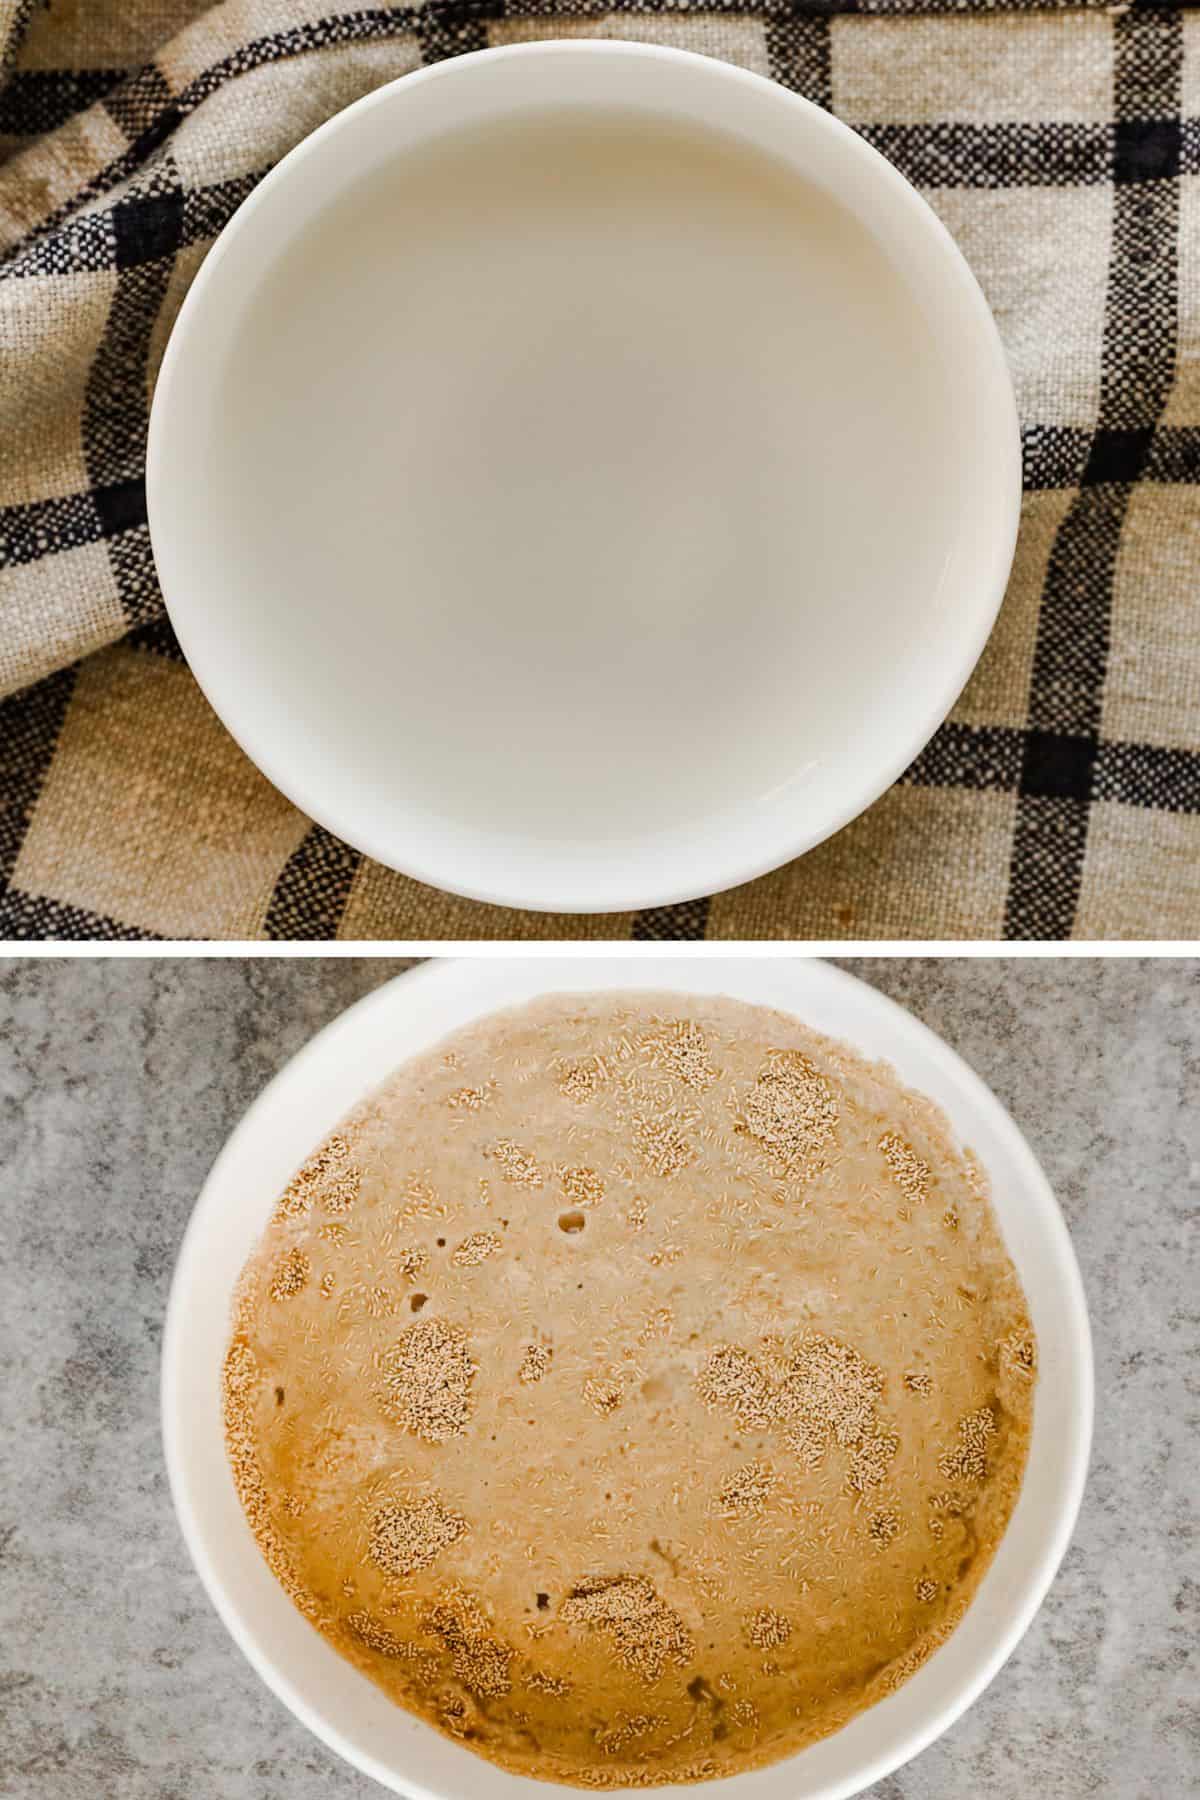
In a small bowl, combine 2 packages active dry yeast with ½ cup lukewarm water (110-115°F).
Stir gently and let it sit for 5-10 minutes until foamy. If the mixture doesn't foam, the yeast may be expired and should be replaced.
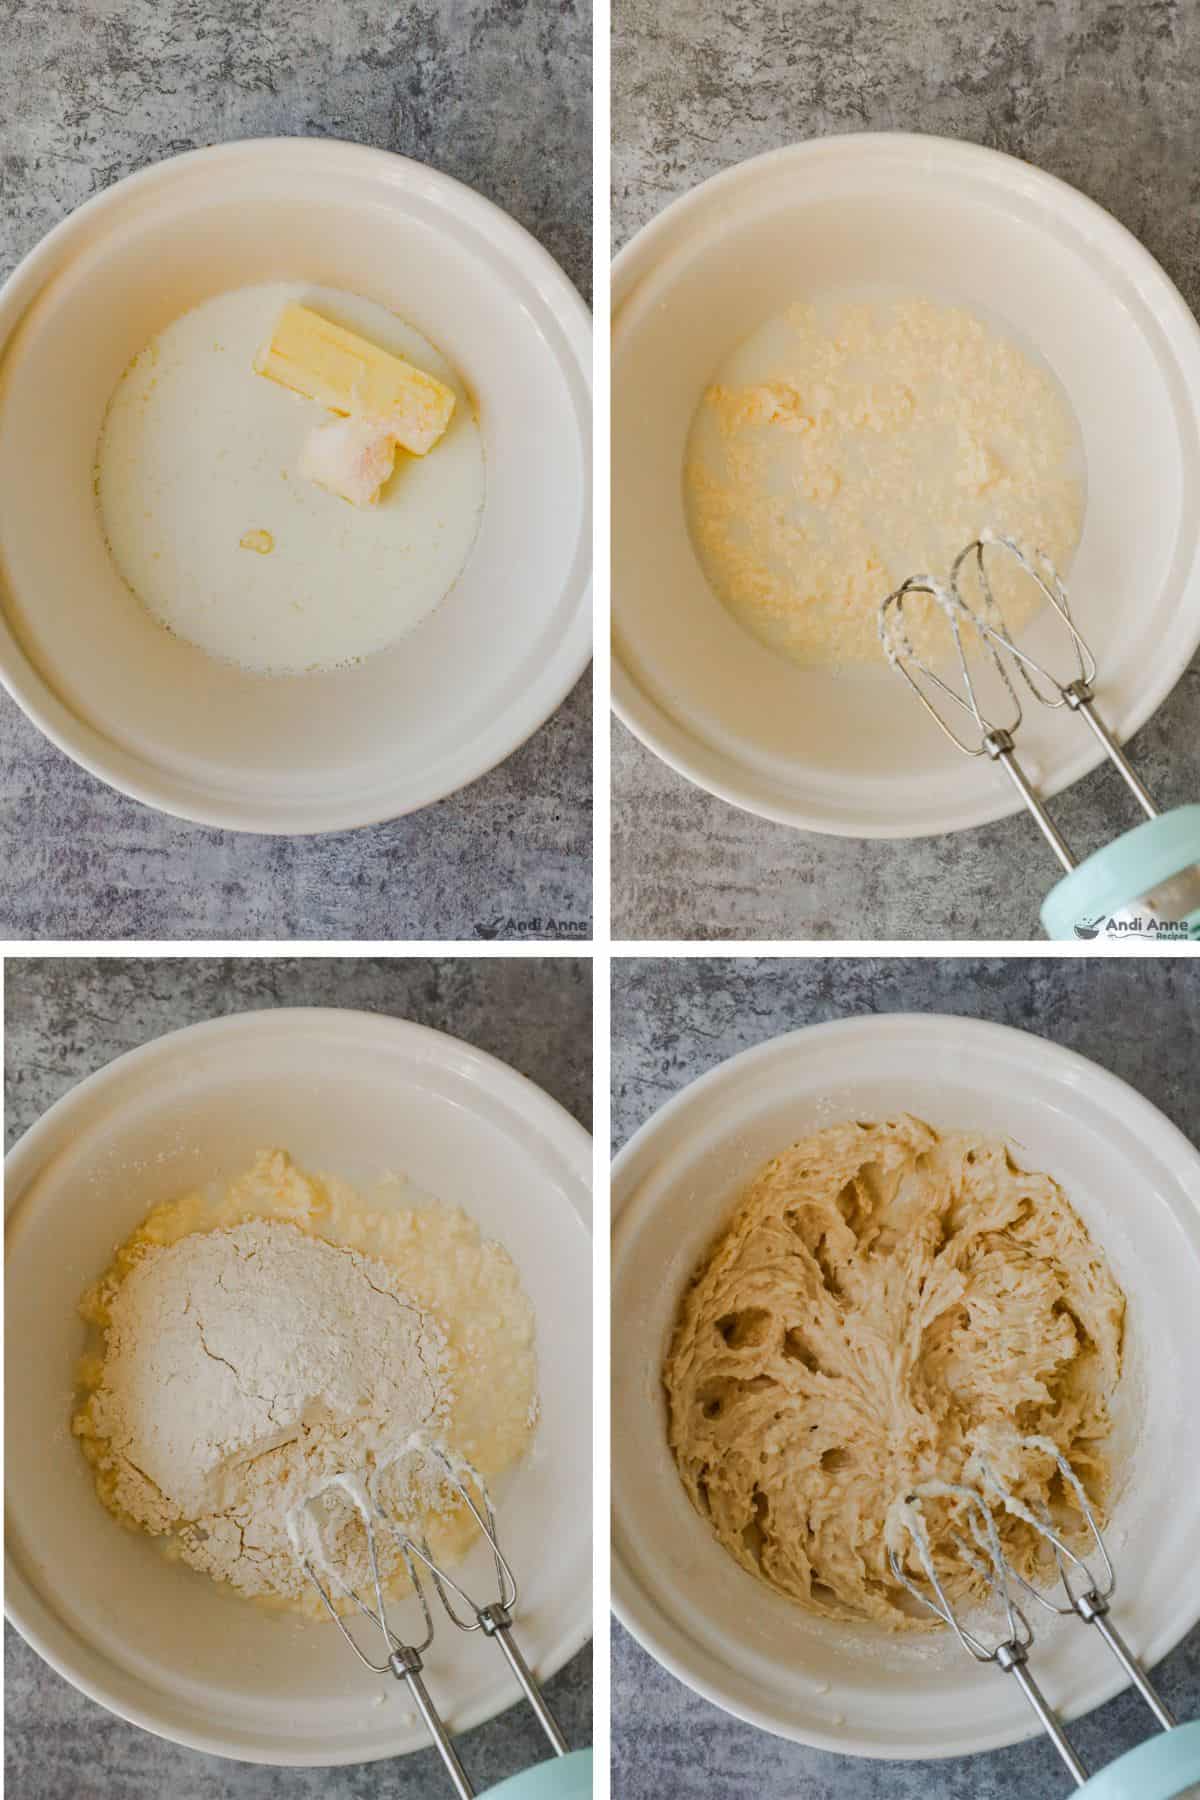
Step 2: Mix The Warm Milk Base
In a large mixing bowl, combine ¾ cup hot milk, ½ cup softened unsalted butter, ¼ cup granulated sugar, 1 tsp salt.
Stir until the butter melts and everything is combined. Let the mixture cool until it feels warm but not hot.
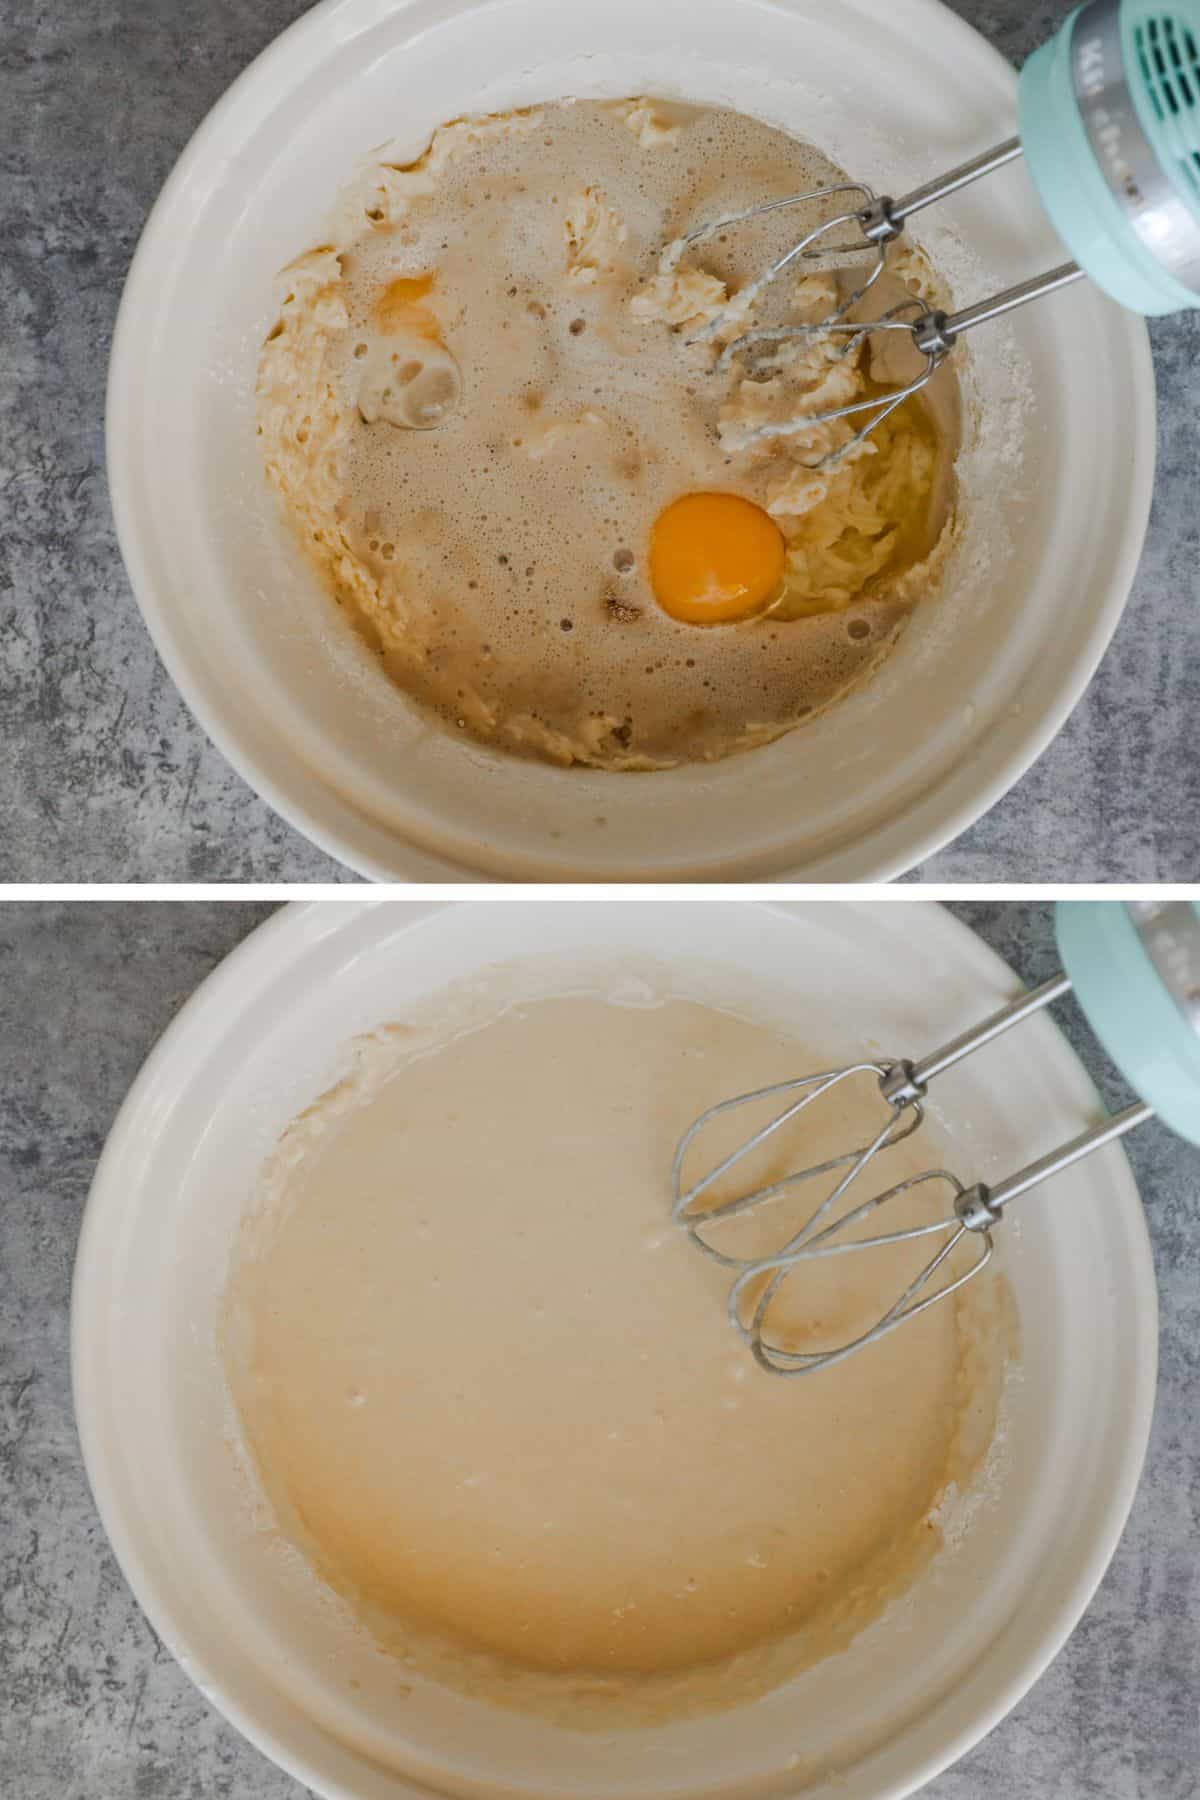
STEP 3: Add The First Flour And Eggs
Add 1½ cups all-purpose flour to the warm milk mixture.
Beat the mixture by hand or with an electric mixer on low speed for about 1 minute until smooth.
Add the 2 eggs and the activated yeast mixture, then mix again until fully combined.
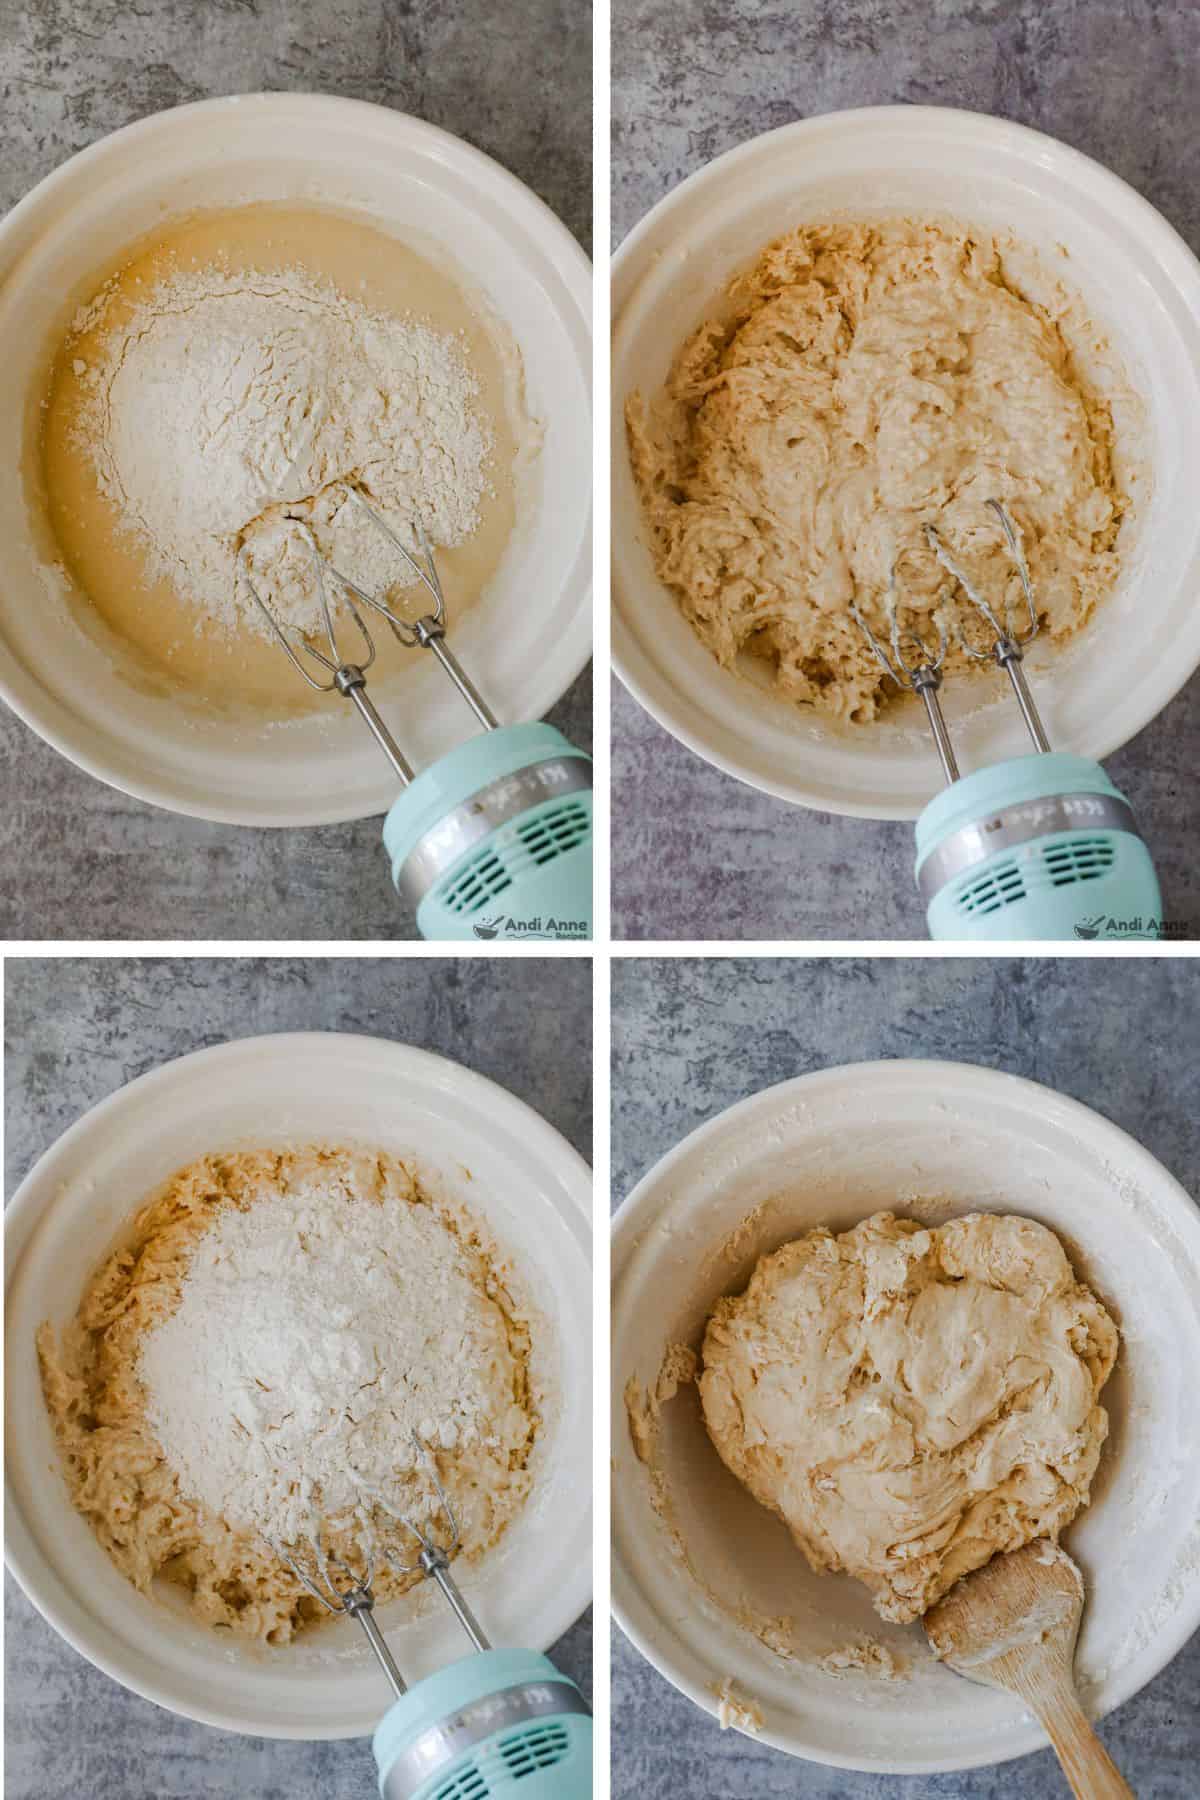
STEP 4: Form The Dough
Gradually stir in the remaining all-purpose flour (about 2¾ to 3¼ cups) a little at a time until a soft dough forms that pulls away from the sides of the bowl.
The dough should feel soft and slightly tacky but not sticky.
STEP 5: Knead The Dough
Turn the dough onto a lightly floured surface.
Knead the dough for about 8 minutes until it becomes smooth, elastic, and no longer sticky.
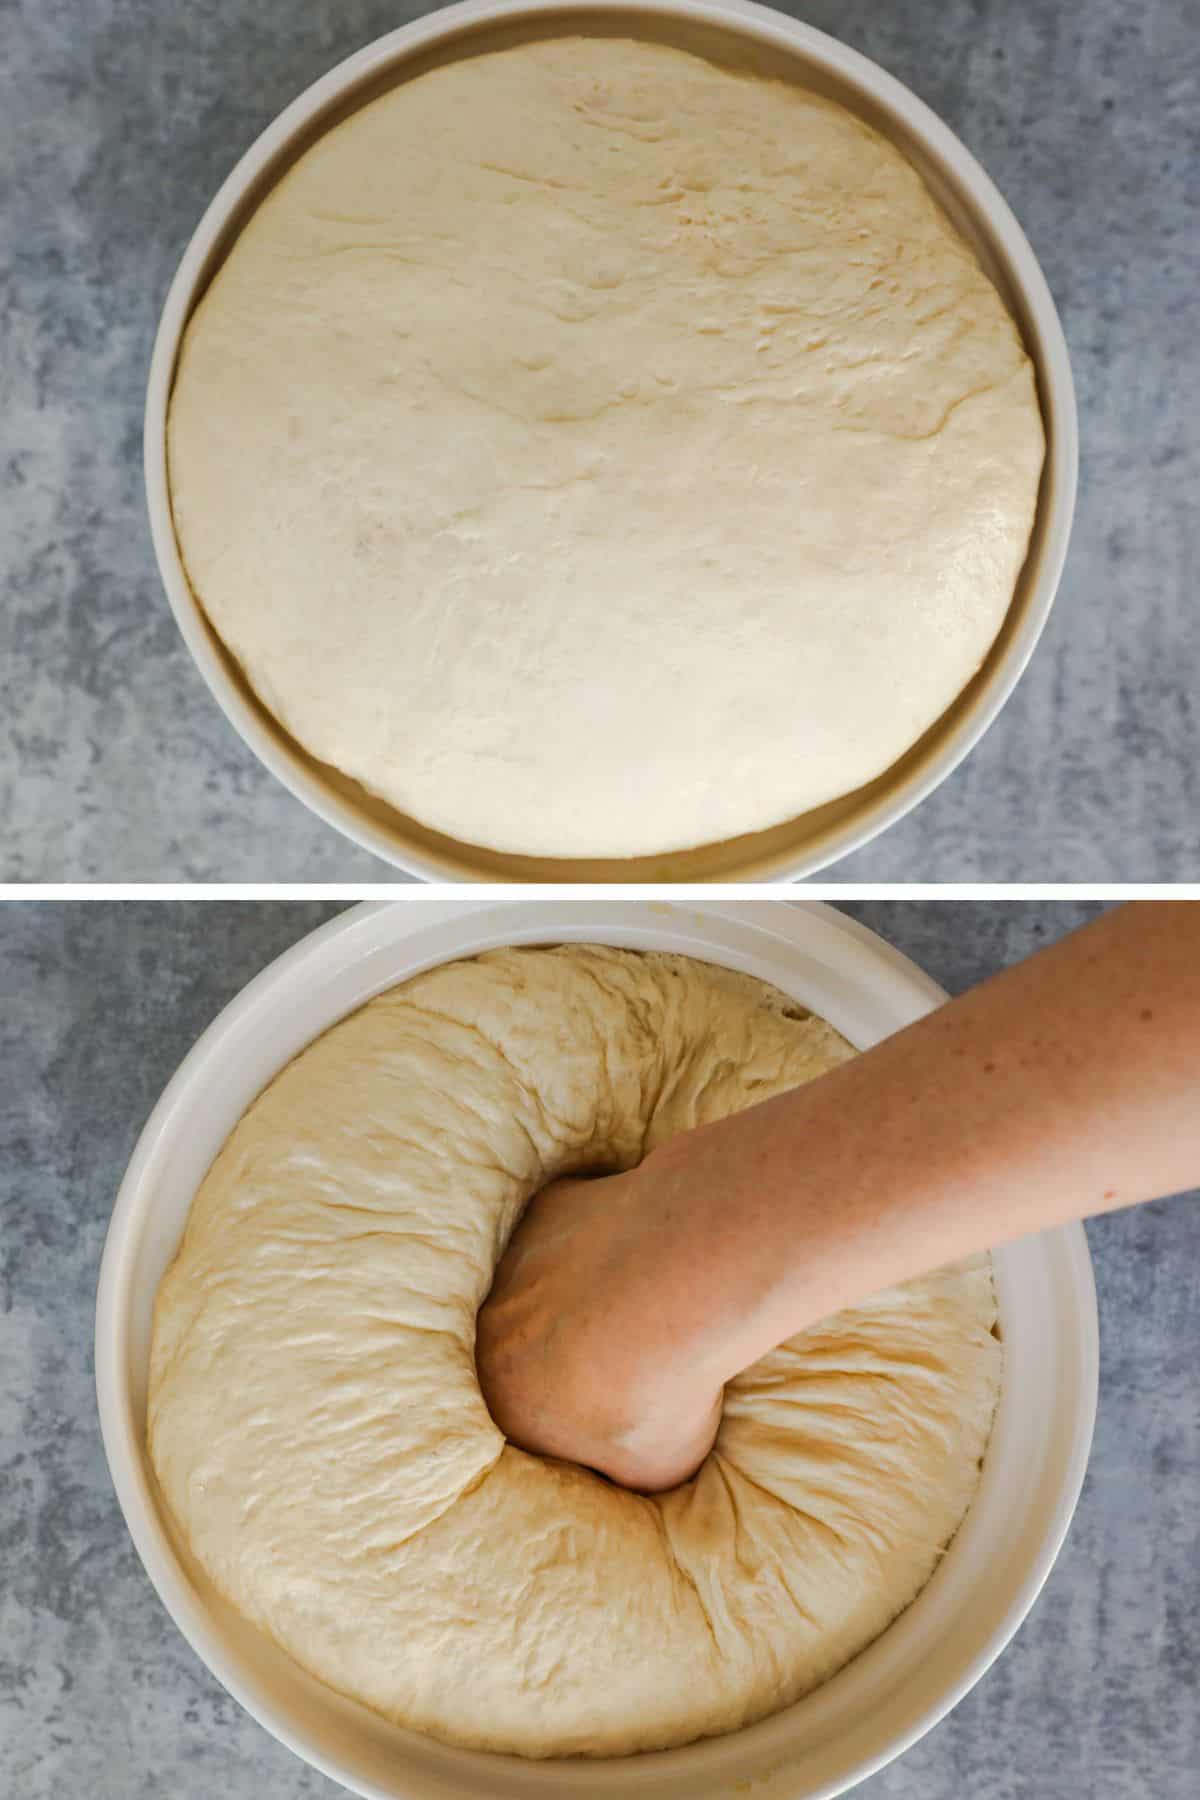
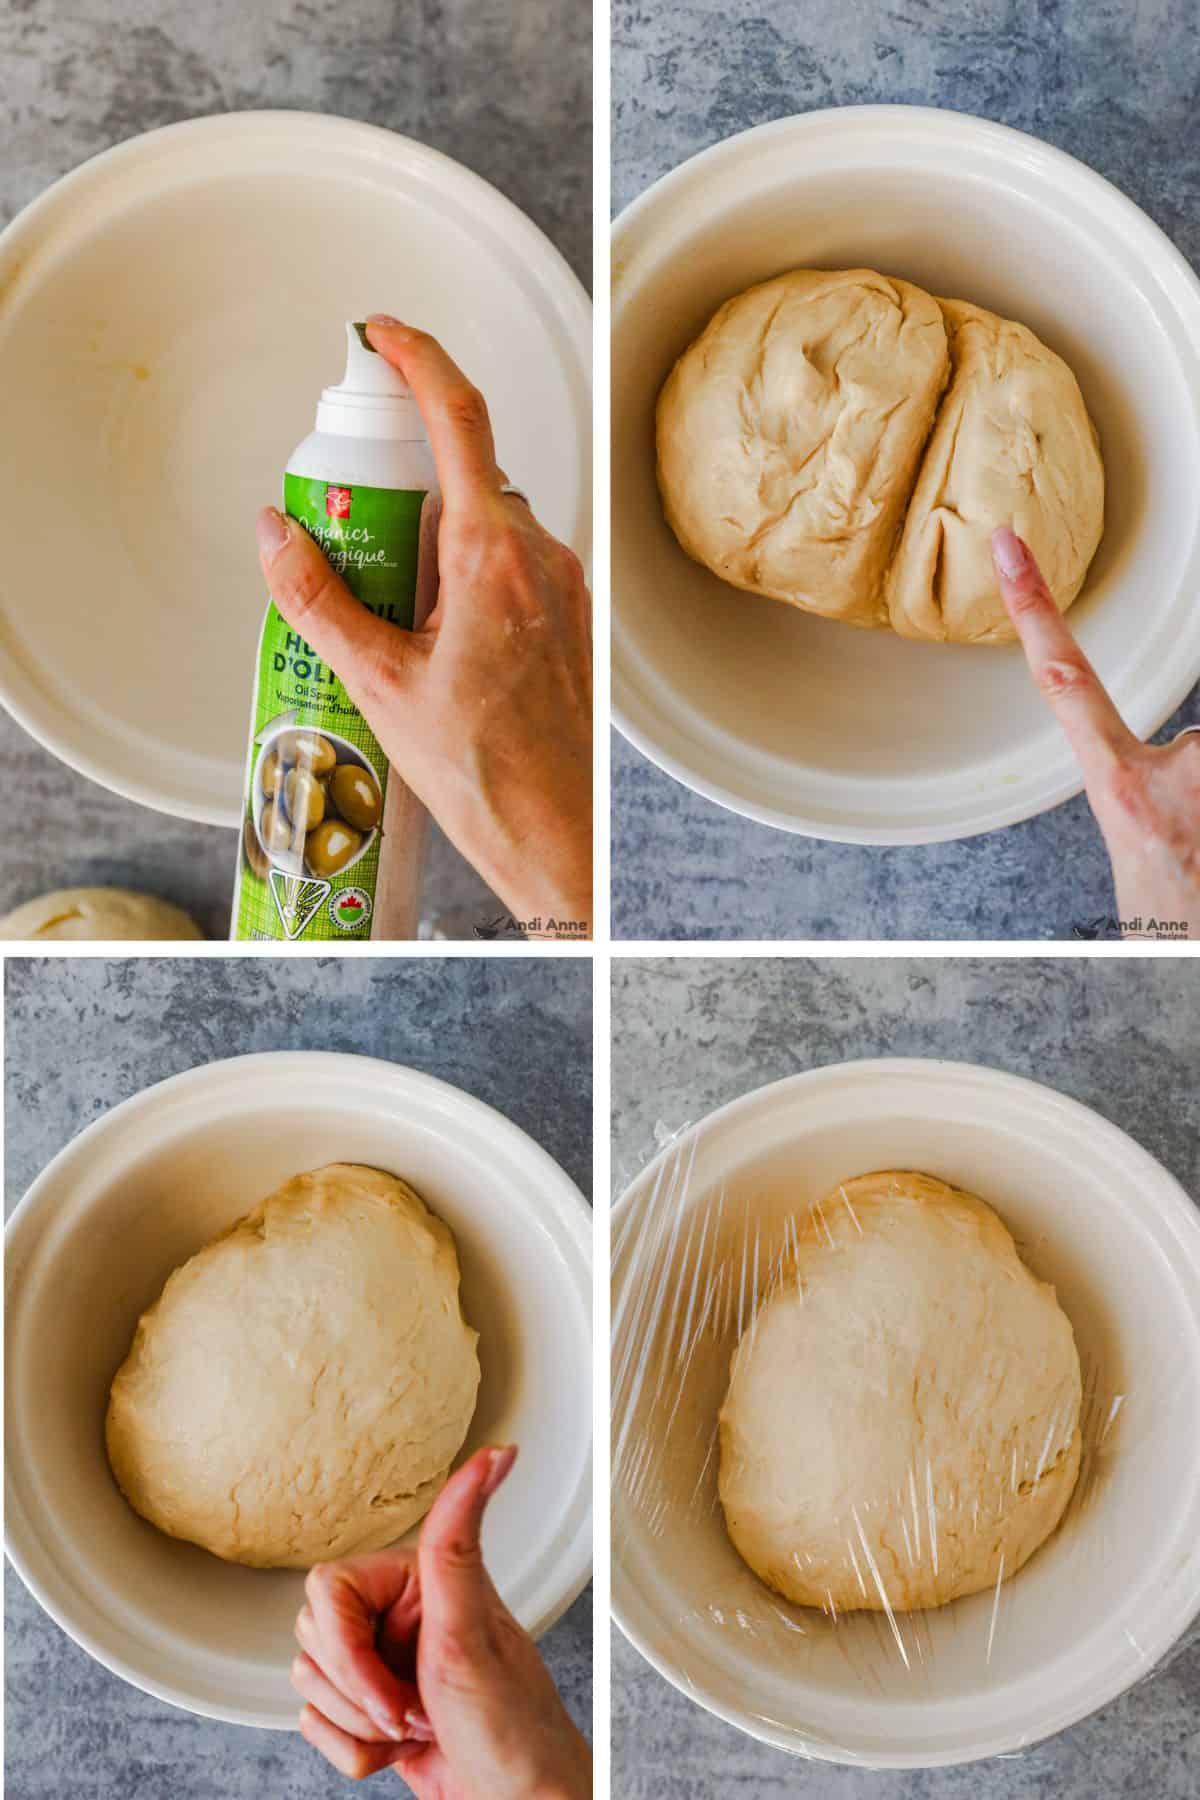
Step 6: First Rise
Place the dough in a lightly greased bowl, turning it once so the surface is coated.
Cover the bowl with plastic wrap or a clean towel and let it rise in a warm place for 1 to 1½ hours, or until the dough has doubled in size.
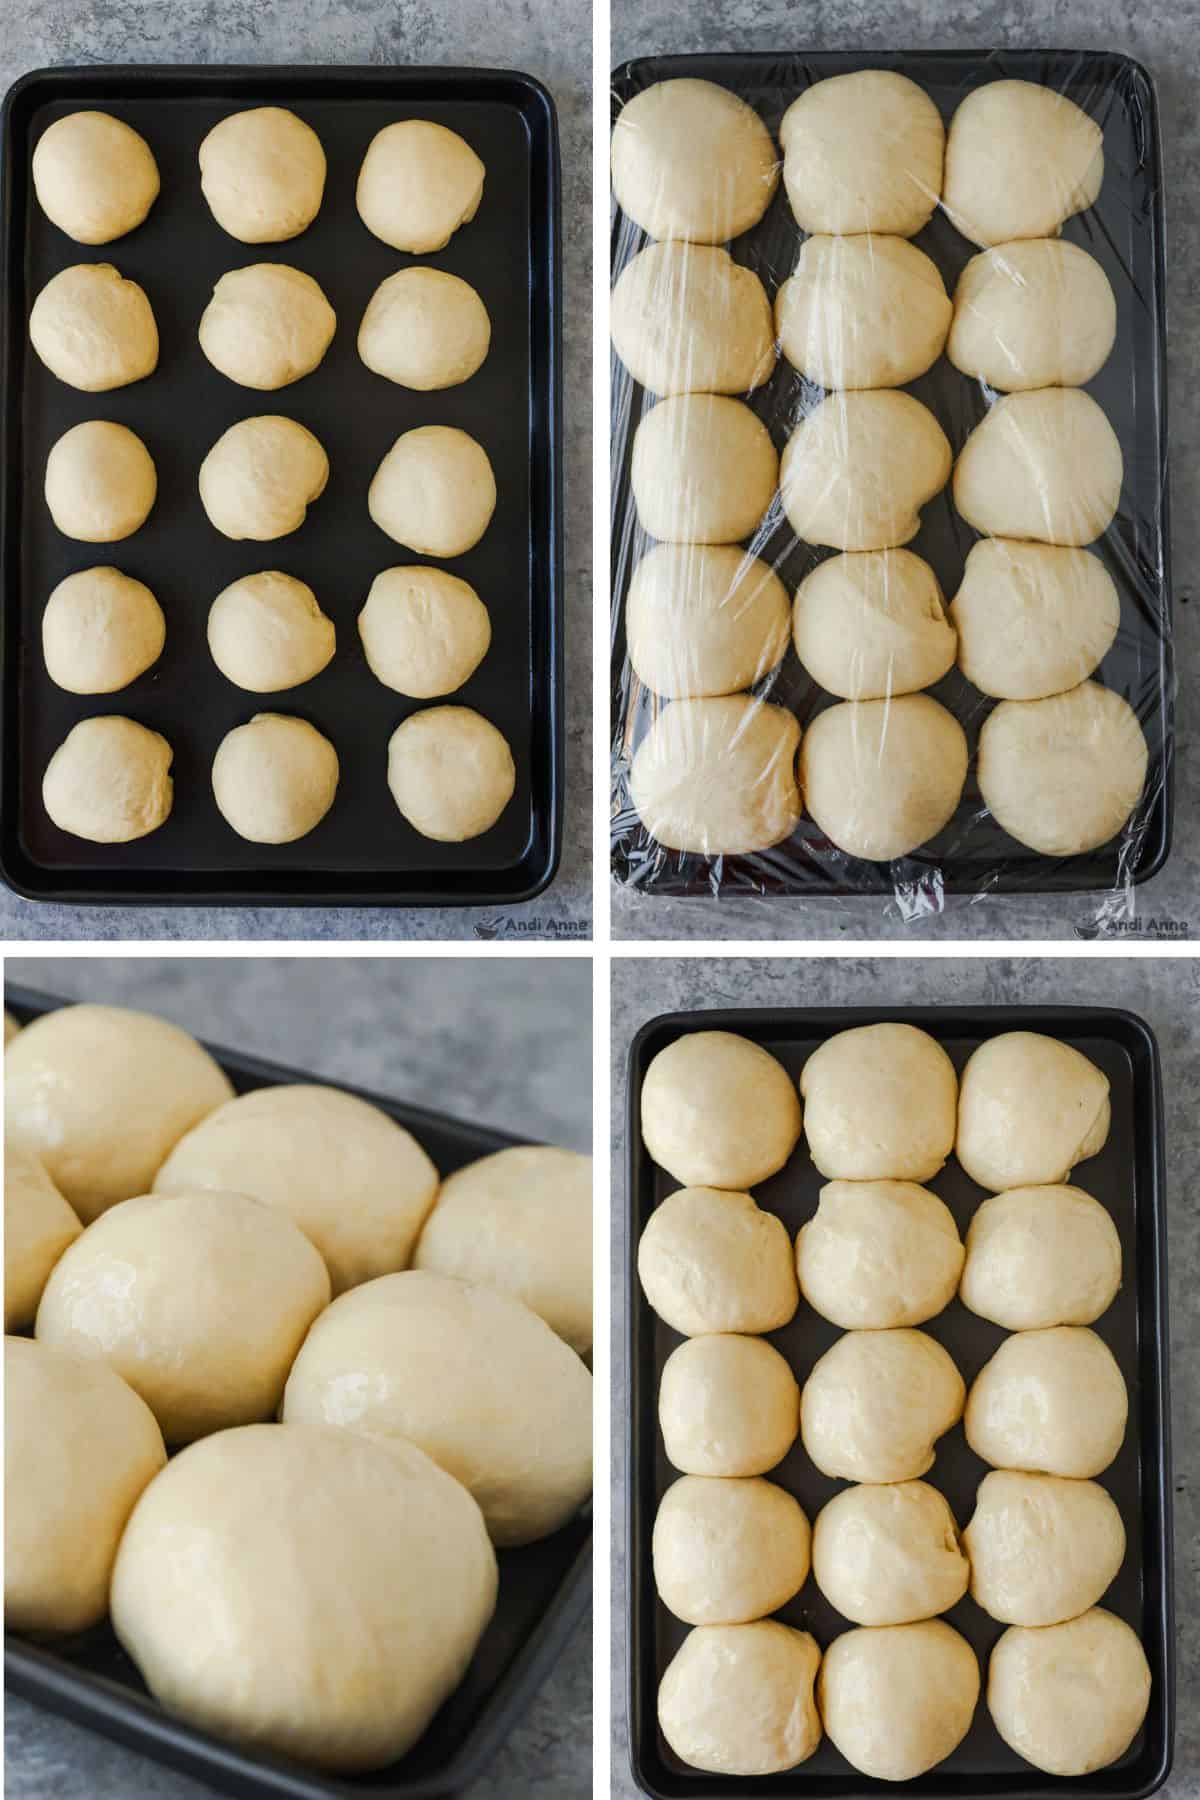
STEP 7: Shape The Dinner Rolls
Punch down the dough and transfer it to a lightly floured surface.
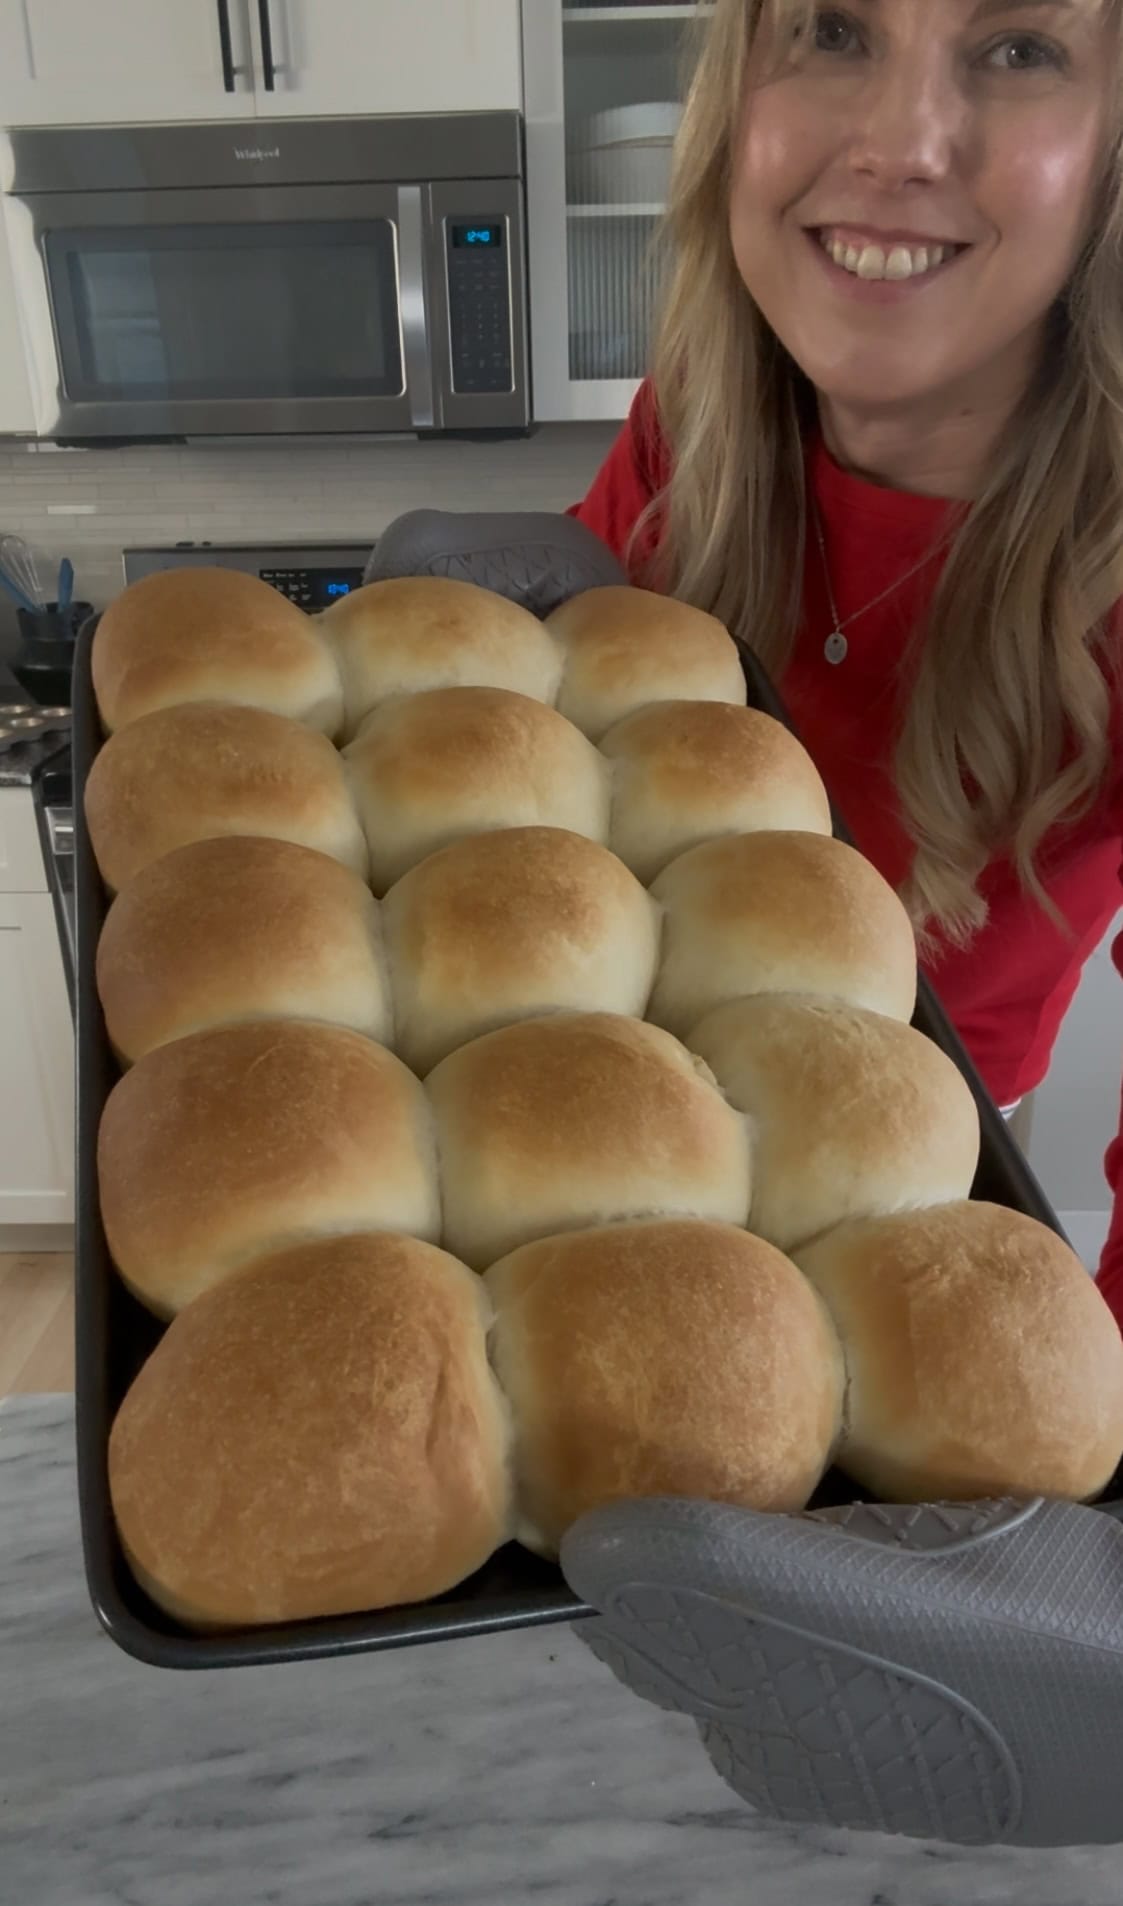
Divide the dough into about 15 rolls. If you have a food scale, you can weigh each piece to about 3.4 oz (96 g) so all the rolls bake evenly.
No food scale? No problem. Just divide the dough in half, then in half again, and keep dividing until you have about 15-16 pieces of dough.
They don't need to be perfect, homemade dinner rolls always look charmingly rustic.
To form each roll:
- Pinch the edges of the dough underneath to create a smooth top.
- Hold your hand in an "OK" shape and gently roll the dough ball on the counter.
- This tightens the surface and places the seam on the bottom.
- Place the dough balls seam-side down on a greased baking sheet.
Step 8: Second Rise
Brush the tops lightly with melted butter and cover loosely with plastic wrap.
Let the rolls rise for 30-45 minutes, or until doubled in size.

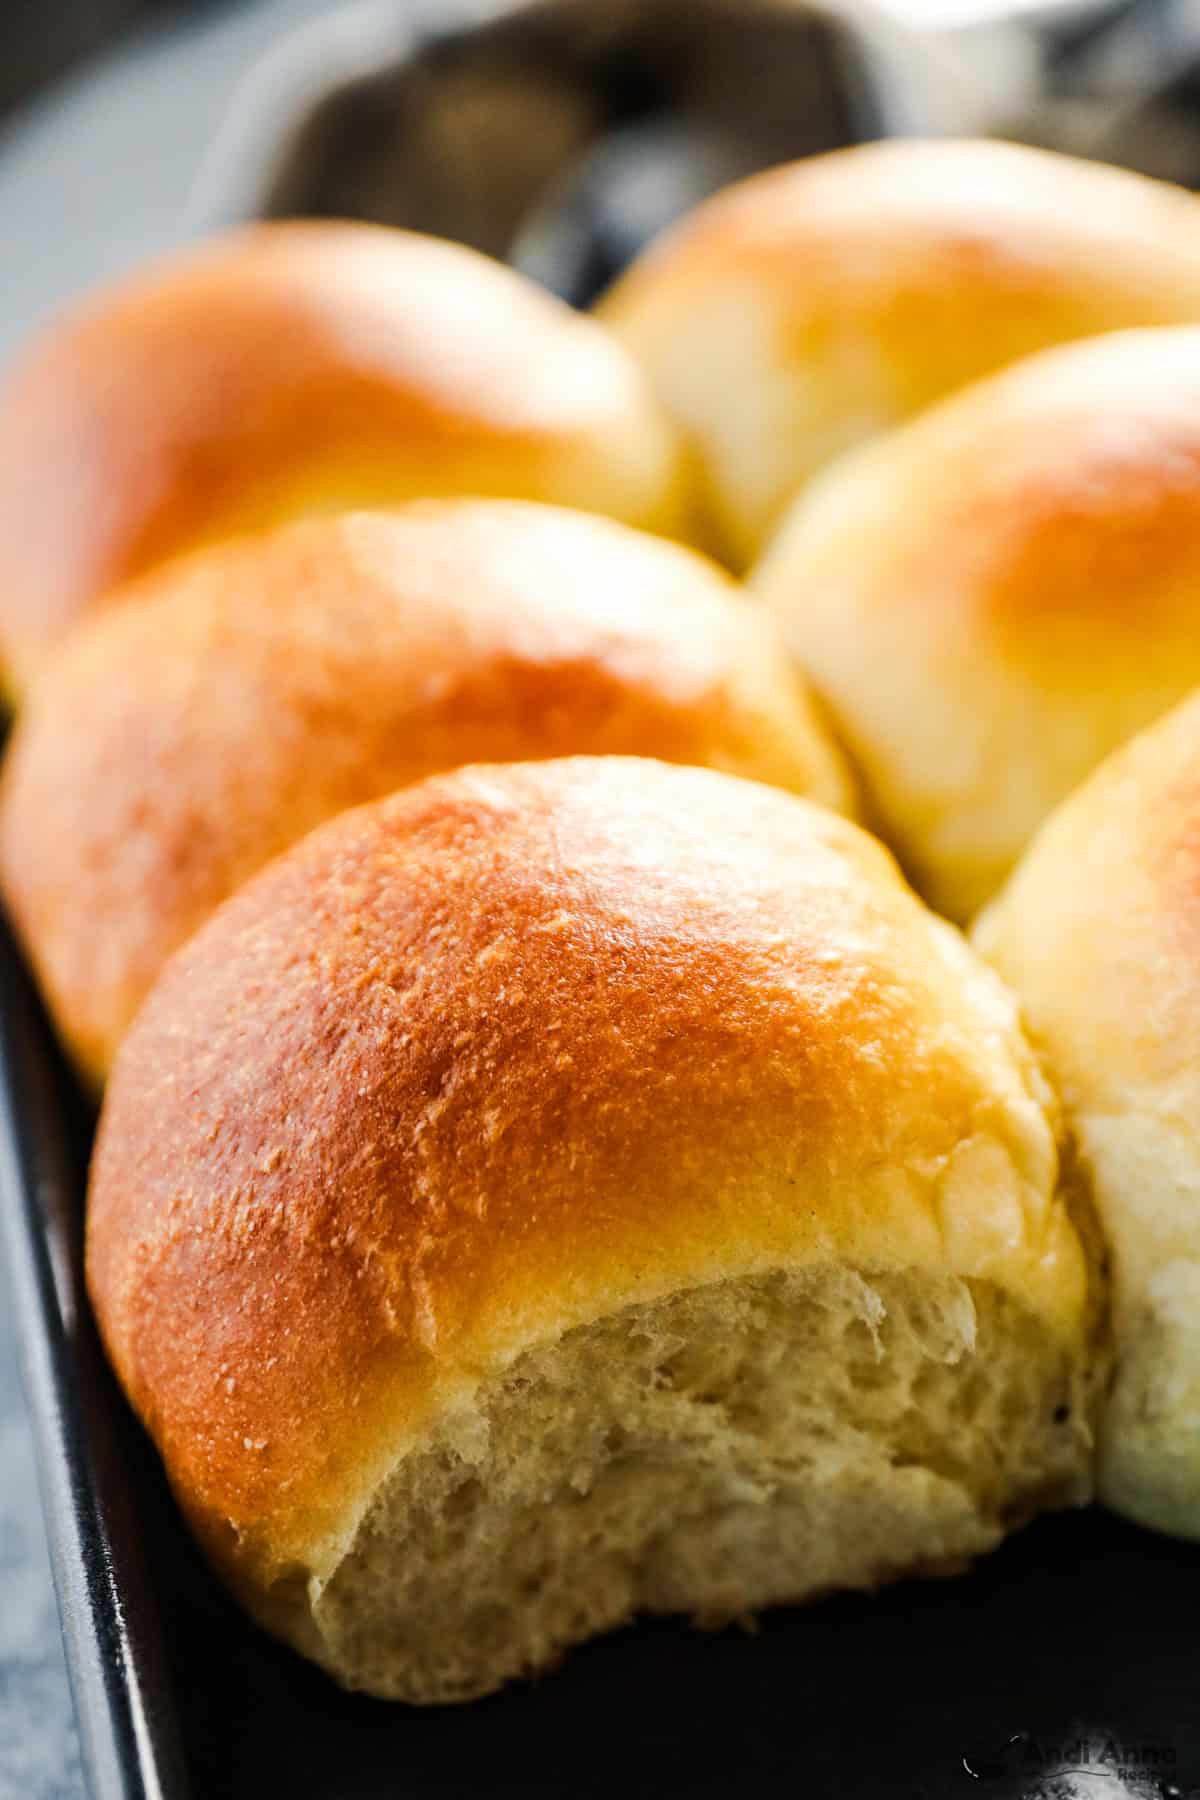
Step 9: Bake The Rolls
Bake in a 375°F oven for 12-15 minutes, or until the tops are golden brown.
As soon as the rolls come out of the oven, brush the tops with melted butter for extra flavor and soft tops.
Recipe Tips
- Milk temperature matters. It should feel like hot chocolate, warm but not scalding.
- Use fresh yeast. If it doesn't foam in the water, start over.
- Don't over-flour. Too much flour makes dense rolls.
- Shortening works too. It gives a slightly different texture but still soft.
- Brush with butter right away. This keeps the tops soft and adds flavor.
- You can shape these dinner buns slightly smaller for holiday meals.
Watch How To Make These Homemade Dinner Rolls 👇👇
Soft, fluffy, golden tops, this is the batch that finally got it perfect.
Storage & Reheating
- Room temperature: Store in an airtight container for up to 3 days.
- Freezer: These fluffy dinner rolls freeze beautifully for later. Freeze fully cooled rolls for up to 2 months.
- Reheat: Warm in a 300°F oven for 5-8 minutes or microwave briefly.
These are perfect for meal prep and batch baking when you're planning easy weeknight recipes.
Do You Need a Stand Mixer for Dinner Rolls?
You do not need a stand mixer to make these homemade dinner rolls by hand.
The dough is mixed briefly in a bowl, then kneaded by hand on the counter, which is exactly how many vintage cookbook recipes were written.
That makes this recipe perfect for beginners or anyone who doesn't own an expensive stand mixer. All you really need is a bowl, a spoon, and a few minutes of kneading.
If you want something faster without waiting for dough to rise, these quick no-yeast loaves like cheddar zucchini beer bread and the slightly sweet old-fashioned peanut butter bread come together quickly with pantry ingredients.
Serving Ideas
These soft homemade dinner rolls pair perfectly with classic family dinners, holiday meals, and simple weeknight recipes. If you're looking for more ideas, you can browse my full collection of easy weeknight dinner recipes.
- For holiday meals, serve them alongside roasted turkey, flavorful brown sugar glazed ham, or a juicy baked pork tenderloin for a classic comforting dinner.
- They're also perfect with vegetable sides like creamy garlic mashed potatoes, sweet roasted brown sugar carrots, simple sautéed green beans, or tender oven roasted asparagus.
- You can even use these homemade buns to make sandwiches. Try them with Philly cheesesteak sloppy joes or slice them open and fill them with leftover sirloin tip roast for an easy next-day meal.
- If the rolls start to dry out after a few days, don't throw them away. You can cut them into cubes and bake them into homemade croutons to use on soups or salads.
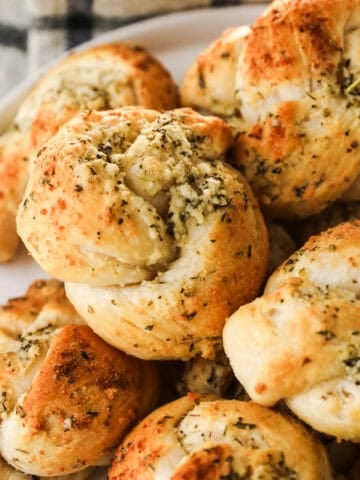
For easy side dishes using store-bought bread or dough, try making twisty appetizer-style pizza breadsticks, buttery homemade garlic bread, my six garlic bread flavors, savory herbed quick bread, or soft garlic parmesan knots made with refrigerated dough.
FAQs
Yes, but the rise will likely be slower and slightly less airy. This recipe was tested with two packets for maximum fluffiness.
Yes. Shape the rolls, cover, and refrigerate overnight. Let them sit at room temperature before baking.
You can, but the texture may be slightly chewier.
Absolutely. Just reduce bake time slightly.
Rich hot rolls are soft yeast dinner rolls made with butter, eggs, and milk. Many vintage cookbooks use this name for what we now call homemade dinner rolls or dinner buns.
Yes. Many older recipes called them old fashioned yeast rolls or rich hot rolls, but they're essentially the same soft, fluffy dinner rolls made with yeast.
The most common reason dinner rolls don't rise is inactive yeast. Make sure the water is about 110-115°F, which is warm but not hot. If the water is too hot it can kill the yeast.
Another common reason is old or expired yeast. When you mix the yeast with the warm water it should start to foam within 5-10 minutes. If it doesn't foam, the yeast is likely inactive and should be replaced with fresh yeast before continuing with the recipe.
And if you enjoy trying traditional breads from around the world, you might also like Norwegian lefse potato flatbread, a soft Scandinavian-style flatbread often served with butter and sugar.
Classic Homemade Dinner Rolls
Tap Stars To Rate!
Ingredients
- ¾ cup milk - microwaved about 45 seconds until hot chocolate temperature
- ½ cup softened unsalted butter - or shortening
- ¼ cup granulated sugar
- 1 tsp salt
- 2 packages active dry yeast - about 5 tsp or 1 Tbsp + 2 tsp
- ½ cup lukewarm water - 110-115°F
- 4¼ to 4¾ cups sifted all-purpose flour
- 2 large eggs
- 2 Tbsp melted salted butter - for brushing tops
Instructions
- In a small bowl, combine 2 packages active dry yeast with ½ cup lukewarm water (110-115°F). Stir gently and let sit for 5-10 minutes until the mixture becomes foamy.
- In a large mixing bowl, combine ¾ cup hot milk, ½ cup softened unsalted butter, ¼ cup granulated sugar, and 1 teaspoon salt. Stir until the butter melts and everything is combined. Let the mixture cool until it feels warm but not hot.
- Add 1½ cups all-purpose flour to the milk mixture and beat well by hand or with an electric mixer on low speed for about 1 minute until smooth.
- Add the 2 large eggs and the activated yeast mixture, then mix until fully combined.
- Gradually stir in the remaining 2¾ to 3¼ cups all-purpose flour (for a total of 4¼ to 4¾ cups flour) a little at a time until a soft dough forms that pulls away from the sides of the bowl.
- Turn the dough onto a lightly floured surface and knead for about 8 minutes until the dough becomes smooth, elastic, and no longer sticky.
- Place the dough in a lightly greased bowl, turning once to coat the surface. Cover and let rise in a warm place for 1 to 1½ hours, or until the dough doubles in size.
- Punch down the dough and transfer it to a lightly floured surface. Divide the dough into about 15 rolls. If using a food scale, weigh each piece to about 3.4 oz (96 g). If not, divide the dough in half, then in half again, and continue dividing until you have about 15-16 pieces.
- Pinch the edges of each piece of dough underneath to create a smooth top. Roll the dough ball gently on the counter using your hand in an "OK" shape to tighten the surface and place the seam on the bottom.
- Place the dough balls seam-side down on a greased baking sheet, brush the tops lightly with melted butter, cover loosely, and let rise for 30-45 minutes until doubled in size.
- Bake in a 375°F oven for 12-15 minutes, or until the tops are golden brown.
- Remove from the oven and immediately brush the rolls with 2 tablespoons melted butter before serving.
Notes
- Use warm water for the yeast. The water should be about 110-115°F, warm but not hot, so the yeast activates properly.
- Let the milk mixture cool slightly. If the milk and butter mixture is too hot, it can kill the yeast. It should feel warm like hot chocolate.
- Add flour gradually. Start with 4¼ cups flour and add more a little at a time until the dough becomes soft and pulls away from the bowl.
- Knead until smooth and elastic. Kneading for about 8 minutes helps develop the gluten so the rolls bake up soft and fluffy.
- Let the dough rise fully. The first rise should take 1 to 1½ hours until the dough doubles in size and feels airy.
- Brush with butter twice. Brushing before baking helps the tops brown evenly, and brushing again after baking keeps the rolls soft and buttery.
- Freeze extras for later. Fully cooled rolls can be frozen for up to 2 months and reheated in the oven for easy weeknight dinners.
Nutrition
Nutrition info is auto-calculated and meant to be an approximation only.
Leave a Reply